Gluten Free Home Brewing Blog
High Gravity Gluten Free Brewing
While the early advances in brewing gluten free beer can be chronicled on the GFHB facebook page, much of what is rapidly evolving can be found here on the GFHB blog! It seems like every few months we are updating our brewing recommendations with the latest and greatest information. And although the gluten free brewing community has seemingly advanced more in the last couple of years than it did in the last decade, there hasn't been much information about brewing high gravity beers.
Matt S. from VA is our guest blogger this month and has shared a wealth of knowledge and experience with high gravity gluten free brewing. Matt has enjoyed craft beer since 2009 and started home brewing conventional beer in 2014 until he was diagnosed with celiac disease in November 2017. Since starting to brew gluten free beer in December 2017 he has brewed a staggering 14 batches including New England IPAs, imperial stouts, light/lacto sours, "milletwines", wee heavies, Belgian strong ales (pale & dark).
High Gravity Gluten Free Brewing
When I got into craft beer over a decade ago, it was because of beers like Dogfish Head’s Fort and World Wide Stout, among others. Over the years, I continued my exploration of these beverages that push the envelope of what beer truly is to include starting home brewing using my own techniques. However, 10 months ago, I was diagnosed with Celiac Disease. In a refusal to be constrained by the limitations and challenges of GF brewing, I decided continue my exploration of high gravity brewing by attempting to address the gaps. It is my hope that this blog will help those of you out there who are contemplating high gravity gluten free brewing (HGGFB) by providing some key pointers and tools, as well as some hard lessons learned I have gone through. So, let’s talk about high gravity brewing with gluten free grains.
***DISCLAIMER*** Just to make this clear up front, I am not a hardened homebrewer with tons of awards to back my credibility (though, I haven’t submitted anything to a homebrew contest either). My objective in brewing is to create the best beer I can according to my desires (which don’t always line up with BJCP standards).
Before my diagnosis, I had experimented with various glutenous recipes starting with Belgian Dubbels and Wits early on, evolving to Russian Imperial Stouts, Imperial IPAs (specifically several attempts at a Heady Topper clone), barleywines, and an attempt at a Dogfish Head Fort clone which came out to somewhere between 16 to 20% abv (depending on which abv calculator you believe; I prefer Brewer’s Friend abv calculator for high gravity brews).
I had conducted significant research on the tools and techniques I planned to use during a high gravity brew day to ensure some level of success as I prepared for the above mentioned high gravity beers. Taking those techniques and applying them to gluten free brewing was fairly straightforward, however GF brewing has some distinct disadvantages and some of the tools leveraged in non-GF brewing aren’t available to GFHBers (yet, hopefully).
I hope by writing this blog, my experiences and knowledge can better prepare those of you contemplating a monster beer like the 15% abv imperial pastry stout I brewed a few months ago (found under recipes as BBA GF Imp Choc Cheesecake Stout). As I write this, I am going to be leveraging my various experiences, specifically one of the recent beers I attempted which ended up as a 10% abv imperial brown ale. Let me just say that my original intent was to write this while I brewed that beer. In reality, I started this blog a week after the beer was brewed due some mash challenges on the brew day. Maybe fate was helping to provide real life examples/challenges I could use. I am not very appreciative though…
My System and Process
Due to the variability in enzymes used, system set ups, and approaches everyone in the GFHB community use, I want to “briefly” touch on my own approach to GF brewing. First, I use the MM2 grain mill and run each grain through twice, separately.
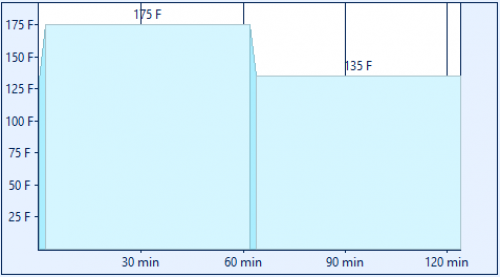
For the mash, I use a 2-step reverse mash where I shoot to mash-in high at-or-above 175 deg F to gelatinize the grains and add my alpha-amylase enzyme (SEBstar HTL). After 60 minutes, I add chilled water to reduce the temperature to 135 deg F for the beta-amylase enzyme, AMG-300L. I also have been using a beta-glucanase (SEBFlo TL) at this lower step as well. Using about 20% rice hulls, I’ve never had a stuck mash and frequently achieve 75% or greater efficiency, even on my high gravity brews.
I recognize these are not your typical assortment of enzymes, even for GFHB, and will recommend anyone out there attempting to follow my example not to do so without further research. The SEBstar and SEBFlo are both intended for distilling and are the first two enzymes I bought. I found them by following links for GF homebrewing enzymes on Grouse’s “Recommendations” page. I use about 5-8mL per batch of each enzyme, so I am still working with the original 4 oz bottles.
In my steep, initial learning curve for GF brewing, I ended up accidentally buying a beta-glucanase (SEBFlo TL) as opposed to a beta-amylase. The missing beta-amylase resulted in my first beer’s fermentation getting stuck at about 1.045 SG. To solve this problem, I searched for and found the lowest temperature tolerant beta-amylase available for quick delivery, AMG-300L. It did the job and then some (I ended up over-attenuating by about 8 gravity points!). Although, AMG-300L works more reasonably for me when used in the mash, though it still hasn’t been perfect. I typically now use 3-5 mL.
As you can see, there was no grand plan regarding my initial approach to the enzymes I use, but the enzymes work well enough together with my mash schedule currently. However, as I use these enzymes up, I am going to explore other enzymes currently being recommended (Termamyl and SEBAmyl L). I intend to still follow the same (or similar) mash schedule.
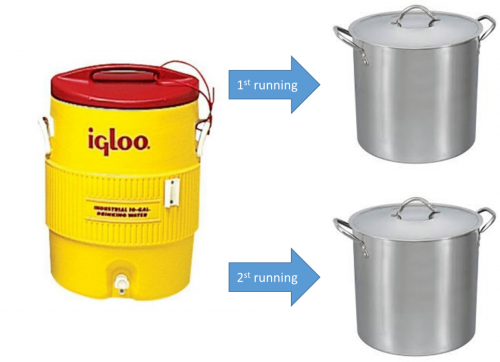
Once the mash is done, I recirculate a few gallons until large particles stop coming through, but typically don’t shoot for perfectly clear wort. Once I’m happy, I drain the first running of wort, then batch sparge and repeat. I have a spreadsheet I use to determine what my expected pre-boil gravity should be to compare against what I am seeing from the mash.
Next, I follow a fairly standard brew approach. I use a 10 gallon BrewBuilt brew pot for nearly all of my batches (with 8 gallon and 5 gallon pots used in support). Given I am brewing on top of my oven, I chose to go with the brew pot that has 4 mm of aluminum for uniform thermal transfer to the brew pot. However, this results in is a less aggressive boil and a bit longer boils compared to my other brew pots.
After the boil, I chill the wort as cold as I can using an immersion chiller, usually between 70-85 deg F depending on the season. I use a pair of wide mouthed fermenters for my beers. I aerate with pure oxygen, which is incredibly important for high gravity beers. I pitch my yeast as soon as I’m ready to store the wort for fermentation. I also rehydrate my yeast in 100 deg F water before pitching.
Introduction to High Gravity GF Brewing (HGGFB)
So, what does high gravity mean really mean? For most barley/wheat based beers, the imperial threshold is set around 8% abv which really means anything with a starting gravity over 1.075 is considered HG. Reaching this threshold for barley brewing is fairly easy to achieve with minimal need for additional steps (possibly a 90 minute boil).
However, for HGGFB, it is a more challenging threshold to reach for various reasons. To extend your gravity even higher is darn near impossible if you limit yourself to traditional brewing norms and standards. My recommendation is to be open to all possibilities or you may have to accept some variation in your final product versus your plan.
We in the GF brewing world already had to throw out some of those norms in how we must approach the mash. However, there are still other norms which most brewers feel constrained by: maximum brew duration of 2 hours, limited use of maltodextrin, only use adjunct sugars for specific flavor/styles profiles, and the list goes on.
By and large, traditional techniques utilized across the brewing world, most somewhat ancient, still very much apply to HGGFB. Some of these techniques are specific to certain styles or even specific beers, but I again suggest not to limit yourself by convention.
In order to determine how to effectively brew a high gravity gluten free beer, the problems you are attempting to overcome must first be understood. Here are some of the primary challenges encountered with HGGFB.
Challenges
Extract Potential Challenge
In a way, I feel like we almost have to redefine where the threshold for high gravity or imperial beers start for GF beers (but I’m not). I’m going to get into a little bit of math, so please bear with me. Extract potential for most barley base malts is usually measured in the high 1.030s, typically around 1.036. GF grains are all below that level. Using data from (1) GFHB.com and (2) BeerSmith, here’s how all the grains compare:
|
Grain type |
Extract Potential |
Extract comparison to 2-Row barley |
Equivalent of 16oz of 2 row |
|
2-Row Barley (US)2 |
1.036 |
-- |
-- |
|
Pale Millet Malt1 |
1.028 |
77% |
20.8oz |
|
Pale Buckwheat Malt1 |
1.030 |
83% |
19.2oz |
|
Pale Rice Malt1 |
1.022 |
61% |
26.2oz |
So, if we apply that to a real world example where we try to recreate a barley-based recipe using 12lbs of malt barley, this same recipe using GF grains will require 15.5lbs of malted millet or nearly 20lbs of rice! Depending on your mash tun, this may break you. Although, GF brewers do typically see some improvement in efficiency out of our mash due to tighter grinding requirements, so we can make up some of the extract potential difference there, but we’re still behind from the start.
Multi-step mash
Unless you have a full wort recirculation system, most GFHBers have settled on a mash schedule that requires multiple water additions to the initial mash. When I started GFHB about 9 months ago, I decided to go with a 3 step process. I got great efficiency out of the first running, but that was at about 7 gallons of wort and no room for sparging. I have since reduced to a 2 step mash, but I still have difficulty attaining a first running gravity above 1.050.
So what is happening? Well, we are experiencing greater dilution due to all the water additions which is only an issue for GFHBers. This is actively working against the goal of ending up with a high final gravity, which you should be shooting to begin your boil with a high of a starting gravity.
No palatable quick-fix substitute like dry/liquid malt extract
Despite my assurances above, HG brewing is a huge challenge for barley brewers as well. Granted, there are factors captured above which further hinder GF brewers a bit more. However, anytime a barley brewer fails to achieve the anticipated gravity out of their mash, they will rely on dry/liquid malt extract to ensure the hit their target gravity (as I did on several occasions).
For HGGFB, there are options like sorghum (and I haven’t touched it yet based on the commercial GF beers I have tried), rice solids, and rice syrup. However, these additives will not maintain flavor the same way as malt extract and could impact flavor in a negative manner. From my personal experience with rice syrup, it was not pleasant and resulted in me swearing off any further use for now other than for yeast starters.
Limitations of mash tun
Limitations of mash tun size is a challenge all brewers will run into. You must design your beer to fit the equipment you are given. For example, maybe you are used to brewing 5 gallon batches at 4-6% abv. However, if you are trying to brew a 10% abv beer, you need to adjust your brewing calculus. You can’t suddenly increase the amount of sugars you are extracting from the grains and still maintain batch size; it’s one or the other. Sometimes, regardless of what levers you pull, you may be constrained by your mash tun.
This challenge is exacerbated further by the fact that you need more grains and more water for each brew. As I was planning my entry into GFHBing, I decided to buy a new mash tun (though this was partly due to the fact that the plastic of my old one absorbed some gluten along the way). In doing my research, I determined I needed a 10 gallon mash tun rather than just replacing the 5 gallon one I had made when I first started all-grain brewing.
Solutions
My philosophy with high gravity brewing is to use every tool in your toolbox. This section will highlight some of the primary tools I use, but if you can think of other options available to you, use them. Some items are common sense, some are traditional brewing techniques, but I take the approach that I use what I need to in order to achieve the desired results.
Brew smaller batches
Don’t be afraid to brew a smaller volume to achieve the desired final gravity. As highlighted in the challenges above, we are all limited by the equipment we use. Because of that, you may say “I can only brew 6% abv comfortably.” Well, what I am saying is it doesn’t have to be that way. If you maximize your grains and apply some of the other tools I discuss below, you can easily achieve higher gravities.
Advanced Mash Techniques
The next three topics will provide solutions to some of the challenges encountered during the mash and hopefully provide you options for achieving a HGGFB. Basically, they focus on how to get the highest gravity pre-boil.
Partigyle Mashes
This has been one of my favorite methods from my barley brewing days. The concept is that you split the mash into two separate beers. Using a lot of grain, you use the first running to produce your initial high gravity wort at low (~55% efficiency), and then use the remaining 25-30% of extractable sugars for a low gravity beer. Some traditional English breweries would even take a third or fourth running from the wort to get more incredibly low gravity beers. Regardless, if you are afraid of wasting expensive gluten free grains (as I am) this is a viable method to consider for use.
In my first attempt at a gluten free beer, I tried to leverage this technique to build up an appreciable amount of beer. The result was a pretty good gingerbread stout and a weak cherry porter. The reason why? Well, my gingerbread stout was too efficient (I achieved an efficiency over 75%) and I used too much rice syrup to make up the difference in the porter. Obviously I was a bit surprised by the performance of my first batch. Regardless, given later brewing experiments, there is definitely potential for using this approach if you understand how efficient each stage of your brew process really is and have a plan if you undershoot or overshoot either batch’s target gravity.
Decoction Mashing
This technique is an age-old step mash process where part of the mash is removed, boiled, and then returned to the mash tun. Traditionally, this technique has been used for some of the oldest recipes from Trappist ales to German lagers. Like any step mash, it is primarily intended for grains which are not fully modified. In the GFHB world, a number of brewers employ this technique using multiple steps to achieve results. Given the diversity of grains available, malted and unmalted, this technique opens many new opportunities.
So, naturally, decoction mashing would hold value in HGGFB. If you employ any type of step mash which sees temperature increases but has no active heating element, decoction mashing would be process of choice, especially if you are attempting to maintain a high start gravity post-mash. I have employed a variant on this concept to some extent early on when I used a third step to raise the temperature back up to 160 deg F for my final mash step.
Double Mashing

This process is just what it sounds like. You will take your wort from the initial mash, and use it to mash a second time in a second tun. So, if you really love high gravity beers (and long brew days), this is definitely the technique to go for. You will also need a lot more equipment or have a really good plan for how you will execute this ballet of a mash schedule. You will also need nearly double the grains you are using and expect slightly worse efficiency depending on how you planned your brew day. This is an ideal technique to combine with a partigyle brewing as well and you can easily end up with 2-4 beers of varying gravity at the end of the day. If you plan to do a monster brew day like this, start early and get lots of help. This may be a good project for an endeavoring homebrew club to combine resources.
For full awareness, I have not attempted this process myself. However, this approach will allow you to start your boil off with wort at the highest gravity possible compared to any other method discussed. Traditional barley brewers, when using this technique, can easily achieve a starting gravity well over 1.100 SG if done properly. GFHB with this technique should be between 1.080 and 1.100, if not over depending on any efficiency hits you’re willing to take. So if you are planning on doing an all-grain GF beer with minimal added sugars, this is the approach I would recommend.
The Boil
In general, if you are trying to maximize your mash’s efficiency and not doing multiple beers from the same mash, you will likely need to plan to extend your boil. Traditionally, most imperial level boils range from 90 to 120 minutes depending on the intended final gravity. The reason boil limits end at 120 minutes is to prevent too many Maillard reactions, which create melonoidins, reduced sugars created from converting fermentable sugars, proteins, and amino acids, into non-fermentable, flavorful compounds. In imperial beers like stouts and barleywines, these are desirable effects, although the amount will depend on the beer style you are shooting for. In lighter imperial beers, it may be desired to reduce these effects, so be careful.
In the end, I believe it comes down to your equipment and your tastes. Given my equipment creates a fairly light boil, I have had good success with extending my boil up to and past the 3 hour point. Granted, that is making for a long brew day when I boil for that duration, but I am able to reduce the liquid by 33-50% and achieve my goal of 3-4 gallons of HG wort.
Second Running Reduction in second brew pot
There may be many reasons you choose to use this technique. The idea is instead of sparging the second running into the primary brew kettle, you bring in a second pot and sparge the second running into that vessel. The second running will be lower gravity, but the idea is there will be less liquid in this volume. When you boil the second kettle as long as the primary vessel, you will boil this wort down much further, thus concentrating it further.
There a couple primary reasons one may choose to use this technique. This is another ancient technique used by a few English brewers to create barleywines like Thomas Hardy or JW Lees. However, this is also a useful tool for correcting mistakes encountered during your mash making this a good fallback option in order to help overcome poor starting gravity. Just be cognizant of potential impacts to hop utilization and adjunct flavoring if you combine after the boil is complete.
Sugars
Non-fermentable sugars
The use of non-fermentable sugars is one area which I will likely continue to adjust as I get a better handle on fermentable vs non-fermentable extraction from GF grains. At this point, I typically start a beer assuming I will be shooting for maximum attenuation according to the yeast I am using. I am slowly developing my models which I am hoping will inform my mash temperatures or enzyme utilizations similar to the single infusion temperatures for barley to achieve the desired fermentable and non-fermentable profiles from the grains alone.
However, until I build my own personal knowledge I will continue to use non-fermentable sugars such as lactose and maltodextrin (and if I absolutely need to, enzymes in primary if the beer has under-attenuated) to help me achieve desired results. My goal with brewing is to create the most palatable beverage for myself according to what I had been enjoying previously.
When I approach HGGFB, I look at lactose and maltodextrin as an opportunity to create and control precise mouthfeel and sweetness profiles for my beers. My thoughts are to use as much lactose as desired to meet sweetness desired, then add maltodextrin to reach the final gravity levels. For the imperial stout I brewed recently, I was aiming to create my take on a pastry stout, which typically sees final gravities around 1.040. For this beer, I used 1 lb each of lactose and maltodextrin resulting in over half the final gravity being derived from non-fermentable sugars.
Fermentable Sugars
There is a wide variety of sugars out there which I have started using to augment the lost extract potential and to help reduce the boil times. One of my favorites for IPAs is honey to provide a bit more complexity. Maple syrup, brown sugar, turbinado, and molasses are a few out of many great options to help gravity and enhance the flavor profiles of malt forward beers. Belgian sugars and syrups provide unique and varying options to evaluate as well. Across the many GF beers I’ve brewed, the most fermentable sugars I’ve used is up to 0.6667 lbs/gallon.
One thing to remember when using 100% fermentable sugars, their use will thin out your mouthfeel and dry your beer out. This may be desirable, but if you’re making a massive imperial stout, you will likely need to compensate for this dryness by increasing your use of non-fermentable sugars.
Yeast
There isn’t a lot to talk about from a yeast standpoint, but I do have a few main points. First, make sure you use a high alcohol tolerant yeast. My recommendation would be Safale US-05 or Mangrove Jack’s M42 Strong Ale Yeast.
- For US-05, my personal experience has shown it to be tolerant up to at least 15% abv while producing a clean fermentation. This will be my yeast of choice for beers I am looking to either maintain the yeast profile of another yeast, yet complete attenuation, or to ensure the malt-backbone is maintained.
- For M42, I have used it a couple times to ferment a Milletwine and an Imperial Brown, both between 10-11% abv. It is one of the most aggressive strains I’ve experienced, but tends to produce a lot of esters, even when kept below 70 deg F. This would be a great yeast to finish a Belgian ale, but not the clean, malt-forward profile I was looking for.
Given the limitation of available GF yeast, to achieve the desired flavor of a specific beer, it may be necessary to use one of the high gravity yeasts above in combination with another, less alcohol tolerant yeast. The idea is that the lesser tolerant yeast will provide the bulk of the flavor profile desired, while the HG yeast helps complete attenuation.
In order to ensure the yeast is doing its job properly, please ensure you provide sufficient amounts of yeast nutrient and oxygen. I will typically aerate for 90-120 seconds with pure oxygen for higher gravity beers. In reality, you cannot overdo oxygenation. The wort will eventually saturate before you reach a point where there is more oxygen than the yeast can handle.
Practical Example:
One recent beer I brewed was an imperial brown ale, brewed with cinnamon, vanilla, maple syrup, lactose, and almond extract. My original intention was to create a beer equivalent to a cinnamon roll.
I started my mash attempting to follow the process described earlier, attempting to hit 175 deg F for the mash in, then dropping to 130 deg F. As I completed the mash, that’s when things started to go south. I collected 4 gallons of wort from the first running at a SG of 1.043. My prediction (assuming a 3 hour boil) called for a bit under 7 gallons of wort at a pre-boil gravity of 1.049. My second running was reading at 1.023. My overall mash efficiency was at 55% which in my book is unacceptable, especially with 16lbs of grains.
I concluded I had not properly gelatinized some of the grains as my initial mash-in temp started in the low 170s, later dropping to the 160s by the second reading (meaning there were pockets below 160 initially). So, what were my options? I could (a) live with the result and have 6-7% beer, (b) boil for about 3 hours and get down to about 2.5-3 gallons, or (c) spend a bit more time re-gelatinizing the wort and recover some unconverted starches. I chose option (c), heating up 3 gallons worth of wort collected at 1.023 SG to near boiling and remashing well above 170 deg F. After the second mash, I ended up with a second running where the SG was at 1.044 (higher than the initial running). So my preboil stats were 7.5 gallons at 1.044 SG, or about 73% efficiency.
Given the fact that I had already started boiling the first running, I decided I would pull out the second running reduction trick in a second brew pot. I started with nearly 5 gallons in the primary brew kettle at 1.043 SG and 2.5 gallons at 1.044 into a secondary brew pot. I boiled each to the point where I reached about 3.5 gallons in the primary brew kettle and just under 1 gallon in the secondary kettle (note: the SG of the second running kettle was over 1.120 prior to remixing with the first running). At this point, I blended them back together before adding in the late hops or other adjuncts. I tried to minimize splashing as much as possible to minimize any hot side oxidation. In later attempts, I plan to use a high temperature silicone tube from one pot to the next to minimize splashing and transfer one batch to the primary pot.
After completing the boil, chilling, and transferring into the primary fermenter, I aerated for 90 seconds, then pitched my yeast. By later that night, the beer was actively fermenting with a good krausen (initially)! When fermentation kicked off, the wort built an impressive krausen by the time I went to bed that night. But when I woke up the next morning, the krausen was gone, but fermentation was still going crazy. Given I added more than enough yeast nutrient, my only guess is that I didn’t aerate long enough or the yeast was underpitched. Now that I have tapped the beer, head retention is still a problem, though it is improving with each glass.
Back to fermentation, I ended up under-attenuating a bit with a final gravity of 1.037 (I was originally shooting for 1.029) which was not unexpected, so I added a 0.25 mL of AMG-300. I attribute the under-attenuation to the fact that the beta amylase was denatured when I raised the temperature the second gelatinization period, thus only the alpha enzymes were active during this phase and incomplete fermentation was the result. When the added enzymes completed their activity, the final gravity was 1.028. It’s important to not add too many enzymes if you do this as you run the potential of drastically drying out the beer.
Practical lesson #1: Be flexible. Be prepared to adjust your plan or live with the results that come up.
Practical lesson #2: With a 2 step mash process, it is very important to mash-in at a high enough temperature to gelatinize all the grains (note: the below table captures unmalted versions, but still demonstrates the disparity between barley and GF grains).

Practical Lesson #3: If you deviate from your plan, be prepared for more changes later on.
Practical lesson #4: If planning for partigyle brewing, don’t feel compelled to take a suboptimal path if you planned to get poorer efficiency from the first step.
Practical lesson #5: Don’t skimp on yeast, aeration, and yeast nutrient.
Summary
I hope this blog helps someone out there in their endeavors to pursue HGGFB. I would recommend, before you pursue any of the more advanced mash techniques, go and do some additional research on the internet first. There is a lot more information out there to help you develop a plan to take on these techniques and help in planning a complex brew. I highly encourage you to find that information and read as much as possible. My last point of advice:
Don’t be afraid to fail and learn something new along the way.
Good luck!